Showing posts with label Samsung Update. Show all posts

How to install latest Android ICS ROM on Karbonn A7 smartphone


Karbonn A7 is one of the latest and very good android smartphone from Karbonn. Now you can install latest ICS custom ROM on your Karbonn A7 smartphone, Read the complete tutorial below for full information. Pre-requisites

• Please backup all your essential and important files like your messages, contacts etc.
• Make sure that your battery is at least 80% charged, otherwise your device may turn off during updating process. 
• This tutorial is especially for HTC ONE S device so don’t try it on other.
• Turn off all your antivirus as they may create problems.
• Enable your USB Debugging option through this path: Settings>>Applications>>Development>>USB Debugging.

• Download all the derivers and ROMS carefully.

How to install Trick Droid Custom ROM Firmware on HTC ONE S smartphone

1. Download ROM http://www.mediafire.com/?q2l05s73iz4qedv. This file will be in .zip format.

2. Once the ROM is downloaded, connect your Karbonn A7 to computer through USB data cable and move this downloaded ROM file to sd card of your phone.

3. Turn your Karbonn A7 off so that it can be derived to recovery mode. Press and hold Vol. up + key source till screen becomes red.

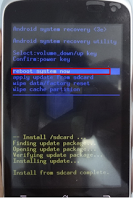
4. Now in the recovery mode, choose apply update from sdcard. Please note that in recovery mode, normal action of phone can’ be used and you will have to use music rocker keys to move up and down through the various options. You can select any option by pressing and holding the power key.

5. You will see one option name update.zip, just select it.

Now wait for some time, till ROM update will be completed.

6. Once the update is completed, select reboot system now from various options available on the screen.


In case you are facing any kinds of problems while updating firmware of your device, please long press power button and repeat the complete process again.
Congrats! You have successfully installed latest Android ICS ROM on your Karbonn A7.

How To Update Samsung Galaxy Ace S5830 to Android 4.1.2 Jellybean


Samsung Galaxy Ace GT-S5830 won’t going to see official Android 4.1 Jelly Bean ever due to its hardware spec but that not going to stop developer to push Android 4.1.2 Jelly Bean on Galaxy Ace S5830.

To update Samsung Galaxy Ace GT-S5830 to Android 4.1.2 Jellybean, follow our guide below.


Disclaimer: The procedure given in this tutorial is considered as risky and may cause damage to your phone. It is recommended that you should not follow it unless you are familiar with these things. Follow this guide completely at your own risk.

I. Before You Begin:

1. The following procedure works for Samsung Galaxy Ace GT-S5830 smartphones.

2. Make sure your device have at least 80% battery power.

3. You must have ClockworkMod Recovery installed on your device.

4. Make sure USB Debugging is enabled

II. Downloading Required Files:

1. Jelly Bean 4.1.2 ROM For Samsung Galaxy Ace S583 [Filename: cooper_PAC_jb-13Dec.zip]

2. Google Apps [Filename: gapps-jb-20121017-KonstaKANG.zip]

III. Install Android 4.1.2 Jelly Bean ROM on Samsung Galaxy Ace S5830:

1. Connect your phone to PC using USB cable.

2. Copy downloaded files to the SD card of your phone.

3. Disconnect USB

4. Turn off your phone

5. Boot into recovery by pressing and holding Volume Down, Home and Power buttons

6. Wipe the Data and Dalvic Cache or you might brick your device afterwards

7. Select install zip from sdcard, then select choose zip from sdcard. (Now, locate the cooper_PAC_jb-13Dec.zip) and select it by pressing Power button.

8. Once the ROM installation process end, repeat the step 7 but choose gapps-jb-20121017-KonstaKANG.zip instead of ROM zip to install the Google apps package.

9. When installation is completed, go back to the main recovery menu and select reboot system now to reboot the smartphone and boot up into customized Android 4.1.2 Jelly Bean

Free work from home License Key Losing weight quickly Quick weight loss Moneys
Congrats! Well known and super customize Android 4.1.2 Jelly Bean firmware based custom ROM now installed and running on your Samsung Galaxy Ace S5830.

How to Unlock Forgot Android Pattern Lock – Easily


Android Pattern unlock in one of the best feature to lock your android device. But what happens if you somehow forget that pattern. So how to unlock you device without using unlock pattern. Now we can share, unlock it with following some simple step. Today here we will guide how you can unlock your Android if you forgot the unlock pattern of your android smartphone. Follow the step below to unlock your device.


How to Unlock Android Pattern with Google Account Username & password


If pattern was wrong 5 times and then it locked, now you can see the new option next to emergency call on your lock screen Forgot Pattern.

Click on the Forgot Pattern option on your device.


Now the new screen will displays where you have to enter Google account ID and password to unlock the pattern of your mobile.


Now enter you Google login and password details to unlock your device from Pattern unlock. Even if Data connection or Wi-Fi isn’t enabled on device, no need to worry. Just fill up the details and your mobile device will be unlocked. This happens because device stores account details offline.

How to Unlock Pattern without Google Account


Here is the other option for those users who didn’t use Google Account on Android. You can do this easily with Factory reset.

Note: with Factory reset option will delete all your settings and apps on your phone, SD card data will be preserve so worry not.

If your Phone have the physical Home button: – Power of the device, after that Press Volume UP+Home+Power button at a time until the phones logo screen is displayed. When the phone’s logo screen is displayed, release the Power button but continue holding the Volume + home button until the Android System Recovery menu is displayed.

Phone Without Physical Home button :- Power off the device, press and hold the Volume Up, Volume Down and Power buttons together until the green Android icon pops-up on the screen.

Free work from home Download Facebook Mutual Money Htc Chacha Moneys
With this way you can enter in to the recovery mode of your android device. Now select the wipe data/factory reset option. Moving the selection up and down is done with the Volume Up and Volume Down buttons. Once you have the wipe data/factory reset option highlighted, you select it by touching the Home button or Power Button (Depend on the device).


This process will take some time after that select reboot system now. That’s it now you done. You phone will now reboot back into normal mode.

Install XXAMI2 Android 4.1.2 JB Firmware on Galaxy Core Duos I8262

Samsung moved out XXAMI2 Android 4.1.2 Jelly Bean official firmware update for Galaxy Core Duos GT-I8262. The firmware update moved out in various countries including Morocco, Kenya, Tunisia and Mauritania; and can also be downloaded for a manual update. You can also modernize your device to this firmware through KIES update. Since the device comes with Android 4.1.2 Jelly Bean out of the box, this new firmware update only brings bug fixes and performance tweaks. Continue reading this guide to learn how to get official stock I8262XXAMI2 Android 4.1.2 Jelly Bean firmware running on Galaxy Core Duos GT-I8262. Nearly all possible ways to update your device to this firmware is discussed here . 


I8262XXAMI2 Android 4.1.2 Jelly Bean stock firmware available on both OTA and Kies update. However, if you can’t get it from there then you can always flash I8262XXAMI2 Android 4.1.2 Jelly Bean firmware on Galaxy Core Duos GT-I8262 manually. We will discuss all available update methods. You should always try OTA or Kies method first and when both methods don’t work then only try manual flashing.


How To Update Galaxy Core Duos GT-I8262 via Kies


  • Make sure you have good internet connection on your computer.

  • Now download and install Samsung Kies on your computer.

  • Turn on your device  and then connect it to computer with USB cable.

  • Run Samsung Kies and wait for it untill detect your device.

  • You should see a New Firmware Upgrade is available at Samsung Kies home screen.

  • Press the Firmware Upgrade button to proceed.

  • Follow on screen instruction and soon you will see your device running upgrade and reboot automatically. Once done, you can disconnect your device from computer.
[ One second if you grasp in Samsung Kies  “This is the latest firmware”. Then your device yet to receive the latest update on  Kies. ]

Then You are done.


Update Samsung Galaxy S Duos GT-S7562 to Android 4.2.1 Jellybean –Custom Rom


s duosWe all wants to get latest ROM for our phone. So, all galaxy S duos users its a very happy news for all that Galxy S duos just recieved Android 4.2.1 custim jellybean ROM. If you want you can root.

ATTENTION:
Read the following instructions carefully while updating your Samsung Galaxy S Duos S7562 to Android 4.2.1 Jelly Bean. Please note that each and every step mentioned in this article is important.


I. Before You Begin:

1. The following procedure works for Samsung Galaxy S Duos S7562 smartphones.

2. Make sure your device have at least 80% battery power.

Downloaded Files Will work from home Internet advertising agency
3. You must have ClockworkMod Recovery installed on your device.

4. Make sure USB Debugging is enabled

II. Downloading Required Files:


III. How to Install Android 4.2.1 Jelly Bean ROM on Samsung Galaxy S Duos S7562:

1. Connect your phone to PC using USB cable.

2. Copy downloaded files to the SD card of your phone.

3. Disconnect USB

4. Turn off your phone

5. Boot into recovery by pressing and holding Volume Down, Home and Power buttons

6. Wipe the Data and Dalvic Cache or you might brick your device afterwards

7. Select install zip from sdcard, then select choose zip from sdcard. (Locate the Jelly Bean 4.2 Rom .zip file) and select it by pressing Power button.

8. Once the ROM installation process end, repeat the step 7 but choose Google apps instead of ROM zip to install the Google apps package.

9. When installation is finished, go back to the main recovery menu and select restart the system now to reboot the phone and boot up into customized Android 4.2.1 ROM

Congrats!!! Well known and super customize Android 4.2.1 Jelly Bean firmware based custom ROM now installed and running on your Samsung Galaxy S Duos S7562.

Root Galaxy Y-S5360 To Android 4.2 Jelly Bean


Y-s5360 Here is another update for samsung galaxy y s5360. Samsung galaxy ace plus y s5360 won’t going to see official android 4.2 jelly bean ever due to its hardware specification but the latest android 4.2 jelly bean update is now possible for samsung galaxy y s5360 although not officially.

Read the following instructions carefully while updating your samsung galaxy y s5360 to android 4.2 jelly bean. Please note that each and every step mentioned in this article is important.


Galaxy Y-S5360 To  Android 4.2 Jelly Bean


I. Before you begin:

1. The following procedure works for samsung galaxy y s5360 smartphones.

2. Make sure your device have at least 80% battery power.

3. You must have  clockworkmod  recovery installed on your device.
        
1.Windows xp


2. Windows vista


 3.Windows


 4.Email marketing


 5. Email


4. Make sure usb debugging is enabled


I i. Downloading required files:


I ii. Install android 4.2 jelly bean rom on samsung galaxy y s5360:

1. Connect your phone to pc using usb cable.

2. Copy downloaded files to the sd card of your phone.

3. Disconnect usb

4. Turn off your phone

5. Boot into recovery by pressing and holding volume down, home and power buttons

6. Wipe the data and dalvic cache or you might brick your device afterwards

7. Select install zip from sdcard, then select choose zip from sdcard. (locate the jelly bean 4.2 rom .zip file) and select it by pressing power button.

8. Once the rom installation process end, repeat the step 7 but choose google appsinstead of rom zip to install the google apps package.

9. When installation is completed, go back to the main recovery menu and select reboot system now to reboot the phone and boot up into customized android 4.2.1 rom


Congrats! Well known and super customize android 4.2 jelly bean firmware based custom rom now installed and running on your samsung galaxy


How To Update LG Optimus One P500 to Android 4.2.1 Jellybean


LG
LG Optimus One is initial mobile in Optimus series. It comes with 600 MHz processor and 512 MB RAM. This device runs on Android 2.3 Gingerbread. The development in technology new Android versions like ICS, Jelly Bean compiled. But due to hardware limitations, Optimus One didn’t receive any of these.


HOW TO UPDATE LG OPTIMUS ONE P500 TO ANDROID 4.2.1 JELLYBEAN

LG Optimus One P500 won’t going to see official Android 4.2 Jelly Bean ever due to its hardware specification but the latest Android 4.2.1 Jelly Bean update is now possible for LG Optimus One P500 although not officially.

Read the following instructions carefully while updating your LG Optimus One P500 to Android 4.2.1 Jelly Bean. Please note that each and every step mentioned in this article is important.

Disclaimer: The procedure given in this tutorial is considered as risky and maycause damage to your phone. It is recommended that you should not follow it unless you are familiar with these things. Follow this guide completely at your own risk.

I. Before You Begin:

1. The following procedure works for LG Optimus One P500 smartphones.

2. Make sure your device have at least 80% battery power.

Windows Xp Advertising Online Windows Vista Advertise Online
3. You must have ClockworkMod Recovery installed on your device.

4. Make sure USB Debugging is enabled

II. Downloading Required Files:

1. Jelly Bean 4.2.1 ROM for LG Optimus One P500    [Filename: cm-10.1-20121224-UNOFFICIAL-p500.zip]

2. Google Apps [ [Filename: apps-jb-4.2.1-light-20121130-signed.zip]

III. Install Android 4.1.2 Jelly Bean ROM on LG Optimus One P500:

1. Connect your phone to PC using USB cable.

2. Copy downloaded files to the SD card of your phone.

3. Disconnect USB

4. Turn off your phone

5. Boot into recovery by pressing and holding Volume Down, Home and Power buttons

6. Wipe the Data and Dalvic Cache or you might brick your device afterwards

7. Select install zip from sdcard, then select choose zip from sdcard. (Locate the Jelly Bean 4.2 Rom .zip file) and select it by pressing Power button.

8. Once the ROM installation process end, repeat the step 7 but choose Google apps instead of ROM zip to install the Google apps package.

9. When installation is completed, go back to the main recovery menu and select reboot system now to reboot the phone and boot up into customized Android 4.2.1 ROM

Congrats! Well known and super customize Android 4.2.1 Jelly Bean firmware based custom ROM now installed and running on your LG Optimus One P500.

Root Samsung Galaxy Ace Duos S6802 to Android 4.2.1 Jellybean

Root Samsung Galaxy Ace Duos S6802 to Android 4.2.1 Jellybean
Samsung Galaxy Ace Duos S6802 won’t going to see official Android 4.2 Jelly Bean ever due to its hardware specification but the latest Android 4.2.1 Jelly Bean update is now possible for Samsung Galaxy Ace Duos S6802 although not officially.
Read the following instructions carefully while updating your Samsung Galaxy Ace Duos S6802 to Android 4.2.1 Jelly Bean. Please note that each and every step mentioned in this article is important.


Read:
         1. Update Samsung Galaxy S Duos GT-S7562 to Android 4.2.1 Jellybean –Custom Rom


Disclaimer: The procedure given in this tutorial is considered as risky and may cause damage to your phone. It is recommended that you should not follow it unless you are familiar with these things. Follow this guide completely at your own risk.

I. Before You Begin:


1. The following procedure works for Samsung Galaxy Ace Duos S6802 smartphones.


2. Make sure your device have at least 80% battery power.


3. You must have ClockworkMod Recovery installed on your device.


4. Make sure USB Debugging is enabled


II. Downloading Required Files:


Android 4 Windows Xp Advertise Online Windows Vista


1. Jelly Bean 4.2.1 ROM for Samsung Galaxy Ace Duos S6802


 [Filename: cm-10.1-20121231-UNOFFICIAL-cooper.zip]


2.  Google Apps [Filename: gapps-jb-20121017-KonstaKANG.zip]


III. Install Android 4.1.2 Jelly Bean ROM on Samsung Galaxy Ace Duos S6802:


1. Connect your phone to PC using USB cable.


2. Copy downloaded files to the SD card of your phone.


3. Disconnect USB


4. Turn off your phone


5. Boot into recovery by pressing and holding Volume Down, Home and Power buttons


6. Wipe the Data and Dalvic Cache or you might brick your device afterwards


7. Select install zip from sdcard, then select choose zip from sdcard. (Locate the Jelly Bean 4.2 Rom .zip file) and select it by pressing Power button.


8. Once the ROM installation process end, repeat the step 7 but choose Google apps instead of ROM zip to install the Google apps package.


9. When installation is completed, go back to the main recovery menu and select reboot system now to reboot the phone and boot up into customized Android 4.2.1 ROM


Congrats! Well known and super customize Android 4.2.1 Jelly Bean firmware based custom ROM now installed and running on your Samsung Galaxy Ace Duos S6802.

Root Micromax Canvas II A110 To Android 4.1.1 Jellybean

  
root micromax canvusThe latest Android 4.1.2 Jelly Bean update is now possible for Micromax Canvas II A110 Smartphone although not officially. Micromax A110 Is Among Some of the Top Best Budget Smart Phones Running Android 4 Ice Cream Sandwich Operating System. All the different specifications of this phone is really appreciable. Micromax says that the phone comes with 1 GB of internal storage, but many users complains that it has 512 MB of internal storage.

ROOT MICROMAX CANVAS II A110 TO ANDROID 4.1.1 JELLYBEAN    


Before You Begin:

1. The following procedure works for Micromax Canvas II A110 Smartphone.

2. Make sure your device have at least 80% battery power.

Windows Xp Windows Vista Email newsletter templates
3. You must have ClockworkMod Recovery installed on your device.

4. Make sure USB Debugging is enabled

II. Downloading Required Files:

III. Install Android 4.1.1 Jelly Bean ROM on Micromax A110 Smartphone:

1. Connect your Micromax A110 to PC using USB cable.

2. Copy downloaded files to the SD card of your Phone.

3. Disconnect USB

4. Turn off your Phone.

5. Boot into recovery by pressing and holding Volume Down, Home and Power buttons

6. Wipe the Data and Dalvic Cache or you might brick your device afterwards

7. Select install zip from sdcard, then select choose zip from sdcard. (locate the Jelly Bean 4.1 Rom .zip file) and select it by pressing Power button.

8. When installation is completed, go back to the main recovery menu and select reboot system now to reboot the phone and boot up into customized Android 4.1.1 ROM

Congrats! Android 4.1.1 Jelly Bean firmware based custom ROM is now installed and running on your Micromax Canvas II A110 smartphone